> ## Documentation Index
> Fetch the complete documentation index at: https://www.helius.dev/docs/llms.txt
> Use this file to discover all available pages before exploring further.
# Bắt đầu nhanh
> Bắt đầu với Helius bằng cách tạo tài khoản miễn phí và thực hiện lệnh gọi API đầu tiên chỉ trong vài giây.
## Thực hiện lệnh gọi API đầu tiên
Đăng ký tại [Bảng điều khiển Helius](https://dashboard.helius.dev/signup). Gói miễn phí hoàn toàn đủ để tạo nguyên mẫu.
Mở thẻ [**Bắt đầu**](https://dashboard.helius.dev/get-started) trong bảng điều khiển, chọn phương thức `getBalance` rồi nhấp vào **Gửi yêu cầu**.
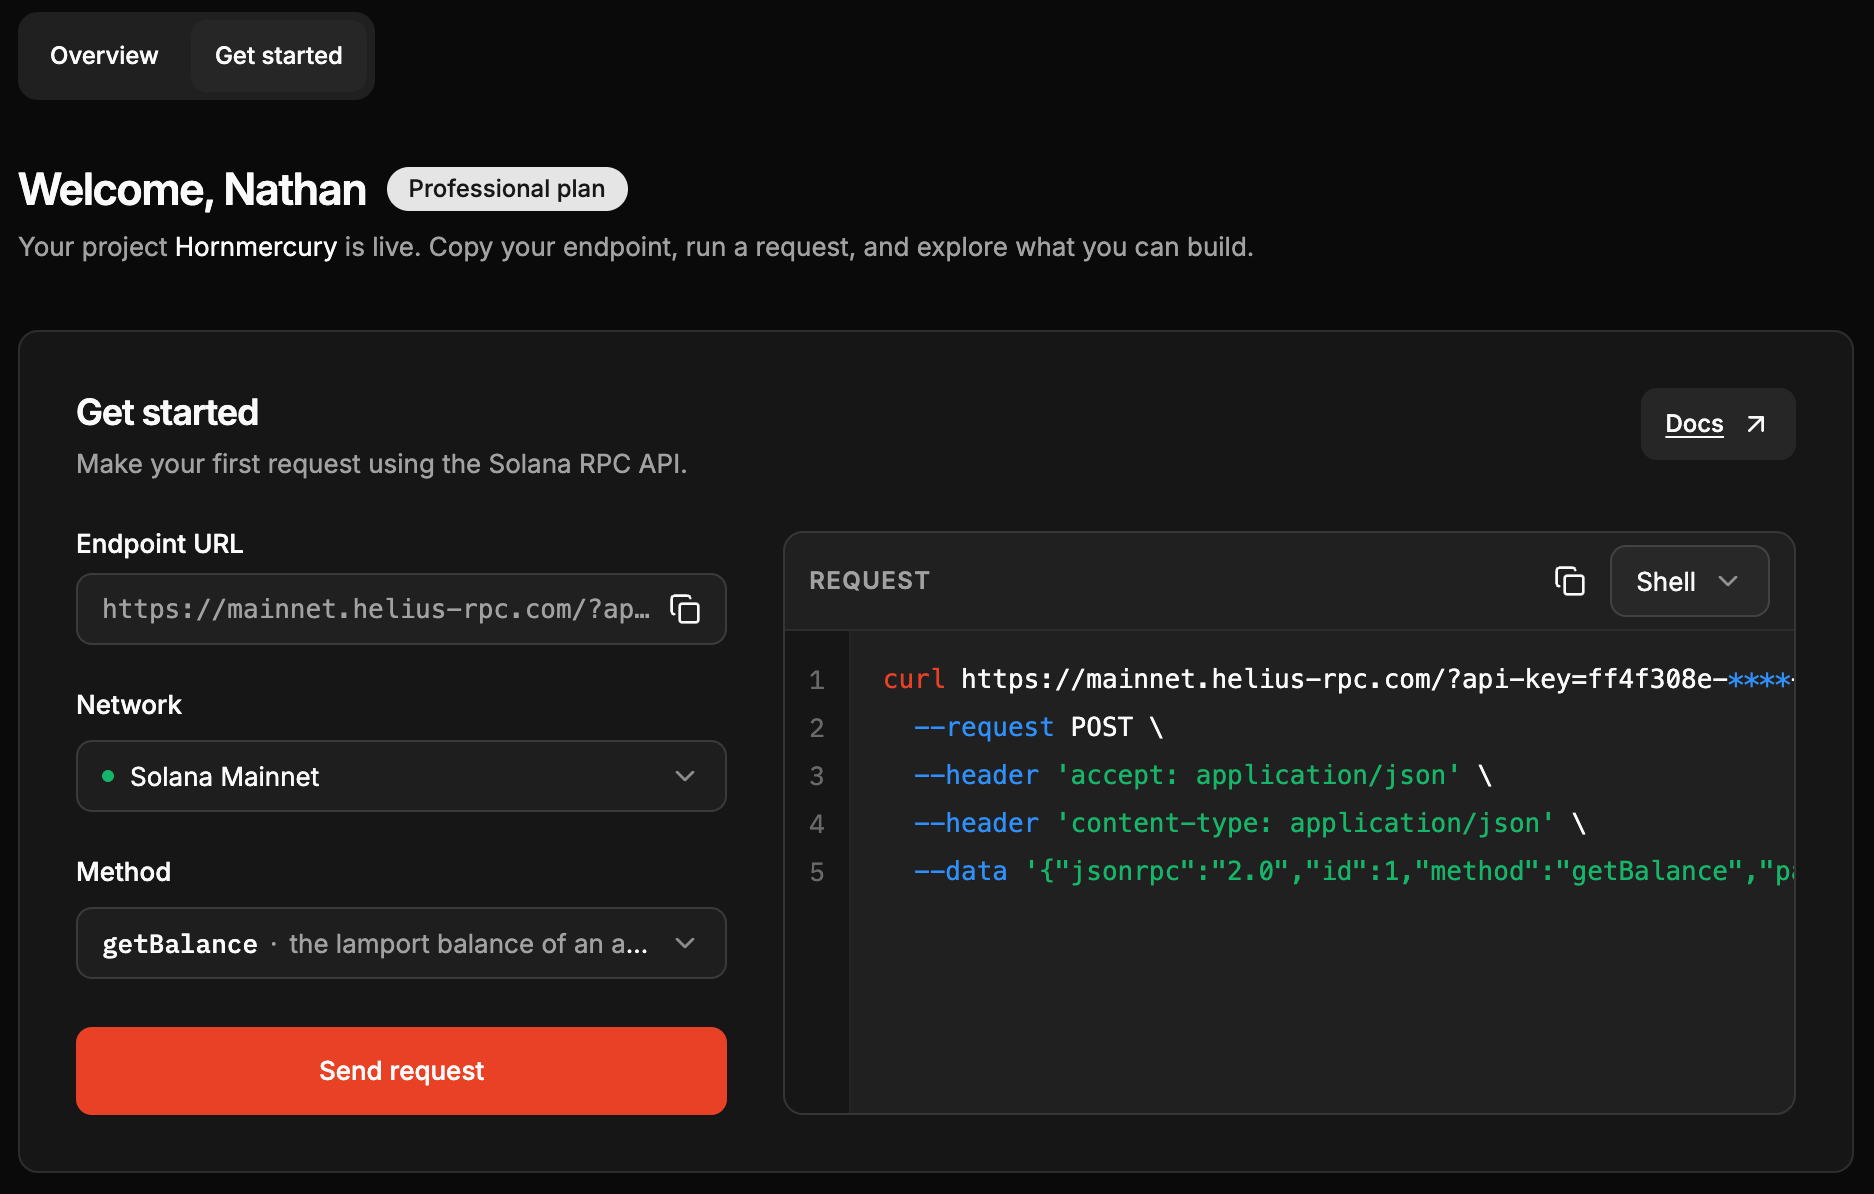 Bạn vừa truy vấn phương thức `getBalance` để lấy số dư của địa chỉ ví. Bạn sẽ thấy phản hồi như sau:
```json theme={"system"}
{
"jsonrpc": "2.0",
"result": {
"context": {
"slot": 434696579,
"apiVersion": "3.1.9"
},
"value": 1266028802962
},
"id": 1
}
```
Hãy thử các phương thức khác như `getTransactionsForAddress` để lấy lịch sử giao dịch hoặc `getAccountInfo` để lấy thông tin chi tiết về tài khoản.
## Các bước tiếp theo
Dữ liệu đã bắt đầu truyền. Hãy chọn bước tiếp theo.
Thêm máy chủ Helius MCP để trợ lý AI có thể xây dựng và gỡ lỗi bằng dữ liệu Solana trực tiếp.
Đưa một giao dịch lên chuỗi với phí ưu tiên và định tuyến trực tiếp đến các leader.
Đăng ký nhận thông tin cập nhật trên chuỗi theo thời gian thực qua gRPC hoặc WebSocket nâng cao.
Làm theo một lộ trình độc lập với mã có thể sao chép và dán để chạy chỉ trong vài phút.
## Kết nối công cụ lập trình AI
Kết nối **[máy chủ Helius MCP](/docs/vi/agents/mcp)** với công cụ AI để công cụ này có thể xây dựng và gỡ lỗi bằng dữ liệu Solana trực tiếp (số dư, siêu dữ liệu tài sản, giao dịch đã phân tích cú pháp, webhook và luồng dữ liệu) thay vì phỏng đoán. Hoạt động với Claude Code, Claude Desktop, Cursor, VS Code, Windsurf, Codex và mọi công cụ tương thích với MCP.
Chạy lệnh sau:
```bash theme={"system"}
claude mcp add helius npx helius-mcp@latest
```
Hoặc thêm vào `.mcp.json` của dự án:
```json theme={"system"}
{
"mcpServers": {
"helius": {
"command": "npx",
"args": ["helius-mcp@latest"]
}
}
}
```
Xác minh bằng lệnh:
```bash theme={"system"}
claude mcp list
```
Bạn muốn cài đặt kỹ năng + MCP trong một bước? Thay vào đó, hãy cài đặt [plugin Helius](/docs/vi/agents/claude-code-plugin). Chạy hai lệnh sau riêng biệt:
```
/plugin marketplace add helius-labs/core-ai
```
```
/plugin install helius@helius-labs
```
Mở **Settings > Developer > Edit Config** và thêm máy chủ:
```json theme={"system"}
{
"mcpServers": {
"helius": {
"command": "npx",
"args": ["helius-mcp@latest"]
}
}
}
```
Khởi động lại Claude Desktop để áp dụng.
Mở bảng lệnh (`Cmd/Ctrl + Shift + P`), tìm **MCP: Add Server** rồi nhập:
* **Tên:** `helius`
* **Lệnh:** `npx helius-mcp@latest`
Hoặc thêm vào `.cursor/mcp.json` của dự án:
```json theme={"system"}
{
"mcpServers": {
"helius": {
"command": "npx",
"args": ["helius-mcp@latest"]
}
}
}
```
Tạo tệp `.vscode/mcp.json` trong thư mục gốc của dự án:
```json theme={"system"}
{
"servers": {
"helius": {
"command": "npx",
"args": ["helius-mcp@latest"]
}
}
}
```
Yêu cầu tiện ích [GitHub Copilot](https://marketplace.visualstudio.com/items?itemName=GitHub.copilot) đã bật hỗ trợ MCP.
Mở bảng lệnh (`Cmd/Ctrl + Shift + P`), tìm **Configure MCP Servers** rồi thêm:
```json theme={"system"}
{
"mcpServers": {
"helius": {
"command": "npx",
"args": ["helius-mcp@latest"]
}
}
}
```
Chạy lệnh sau:
```bash theme={"system"}
codex mcp add helius -- npx helius-mcp@latest
```
Hoặc thêm vào `~/.codex/config.toml` (hoặc `.codex/config.toml` nếu chỉ áp dụng cho dự án):
```toml theme={"system"}
[mcp_servers.helius]
command = "npx"
args = ["helius-mcp@latest"]
```
Xác minh bằng lệnh:
```bash theme={"system"}
codex mcp list
```
## Xây dựng ứng dụng đầu tiên
Mỗi lộ trình đều độc lập, với mã có thể sao chép và dán để chạy chỉ trong vài phút.
**Mainnet.** Token, NFT và SOL qua DAS, cùng dữ liệu lịch sử và nguồn cấp WebSocket trực tiếp.
**Devnet.** Triển khai một chương trình mẫu qua Helius RPC và gọi chương trình đó bằng `sendTransaction`.
## Khám phá nền tảng
Kết nối máy chủ Helius MCP và các SDK để trợ lý AI có thể xây dựng trên Solana bằng dữ liệu trực tiếp.
Duyệt qua mọi điểm cuối Helius: RPC, DAS, giao dịch nâng cao, webhook và luồng dữ liệu.
Truy vấn token, NFT và NFT nén theo chủ sở hữu, bộ sưu tập hoặc đặc điểm.
Truyền trực tiếp dữ liệu blockchain với độ trễ dưới một giây qua gRPC hoặc WebSocket nâng cao.
Bạn vừa truy vấn phương thức `getBalance` để lấy số dư của địa chỉ ví. Bạn sẽ thấy phản hồi như sau:
```json theme={"system"}
{
"jsonrpc": "2.0",
"result": {
"context": {
"slot": 434696579,
"apiVersion": "3.1.9"
},
"value": 1266028802962
},
"id": 1
}
```
Hãy thử các phương thức khác như `getTransactionsForAddress` để lấy lịch sử giao dịch hoặc `getAccountInfo` để lấy thông tin chi tiết về tài khoản.
## Các bước tiếp theo
Dữ liệu đã bắt đầu truyền. Hãy chọn bước tiếp theo.
Thêm máy chủ Helius MCP để trợ lý AI có thể xây dựng và gỡ lỗi bằng dữ liệu Solana trực tiếp.
Đưa một giao dịch lên chuỗi với phí ưu tiên và định tuyến trực tiếp đến các leader.
Đăng ký nhận thông tin cập nhật trên chuỗi theo thời gian thực qua gRPC hoặc WebSocket nâng cao.
Làm theo một lộ trình độc lập với mã có thể sao chép và dán để chạy chỉ trong vài phút.
## Kết nối công cụ lập trình AI
Kết nối **[máy chủ Helius MCP](/docs/vi/agents/mcp)** với công cụ AI để công cụ này có thể xây dựng và gỡ lỗi bằng dữ liệu Solana trực tiếp (số dư, siêu dữ liệu tài sản, giao dịch đã phân tích cú pháp, webhook và luồng dữ liệu) thay vì phỏng đoán. Hoạt động với Claude Code, Claude Desktop, Cursor, VS Code, Windsurf, Codex và mọi công cụ tương thích với MCP.
Chạy lệnh sau:
```bash theme={"system"}
claude mcp add helius npx helius-mcp@latest
```
Hoặc thêm vào `.mcp.json` của dự án:
```json theme={"system"}
{
"mcpServers": {
"helius": {
"command": "npx",
"args": ["helius-mcp@latest"]
}
}
}
```
Xác minh bằng lệnh:
```bash theme={"system"}
claude mcp list
```
Bạn muốn cài đặt kỹ năng + MCP trong một bước? Thay vào đó, hãy cài đặt [plugin Helius](/docs/vi/agents/claude-code-plugin). Chạy hai lệnh sau riêng biệt:
```
/plugin marketplace add helius-labs/core-ai
```
```
/plugin install helius@helius-labs
```
Mở **Settings > Developer > Edit Config** và thêm máy chủ:
```json theme={"system"}
{
"mcpServers": {
"helius": {
"command": "npx",
"args": ["helius-mcp@latest"]
}
}
}
```
Khởi động lại Claude Desktop để áp dụng.
Mở bảng lệnh (`Cmd/Ctrl + Shift + P`), tìm **MCP: Add Server** rồi nhập:
* **Tên:** `helius`
* **Lệnh:** `npx helius-mcp@latest`
Hoặc thêm vào `.cursor/mcp.json` của dự án:
```json theme={"system"}
{
"mcpServers": {
"helius": {
"command": "npx",
"args": ["helius-mcp@latest"]
}
}
}
```
Tạo tệp `.vscode/mcp.json` trong thư mục gốc của dự án:
```json theme={"system"}
{
"servers": {
"helius": {
"command": "npx",
"args": ["helius-mcp@latest"]
}
}
}
```
Yêu cầu tiện ích [GitHub Copilot](https://marketplace.visualstudio.com/items?itemName=GitHub.copilot) đã bật hỗ trợ MCP.
Mở bảng lệnh (`Cmd/Ctrl + Shift + P`), tìm **Configure MCP Servers** rồi thêm:
```json theme={"system"}
{
"mcpServers": {
"helius": {
"command": "npx",
"args": ["helius-mcp@latest"]
}
}
}
```
Chạy lệnh sau:
```bash theme={"system"}
codex mcp add helius -- npx helius-mcp@latest
```
Hoặc thêm vào `~/.codex/config.toml` (hoặc `.codex/config.toml` nếu chỉ áp dụng cho dự án):
```toml theme={"system"}
[mcp_servers.helius]
command = "npx"
args = ["helius-mcp@latest"]
```
Xác minh bằng lệnh:
```bash theme={"system"}
codex mcp list
```
## Xây dựng ứng dụng đầu tiên
Mỗi lộ trình đều độc lập, với mã có thể sao chép và dán để chạy chỉ trong vài phút.
**Mainnet.** Token, NFT và SOL qua DAS, cùng dữ liệu lịch sử và nguồn cấp WebSocket trực tiếp.
**Devnet.** Triển khai một chương trình mẫu qua Helius RPC và gọi chương trình đó bằng `sendTransaction`.
## Khám phá nền tảng
Kết nối máy chủ Helius MCP và các SDK để trợ lý AI có thể xây dựng trên Solana bằng dữ liệu trực tiếp.
Duyệt qua mọi điểm cuối Helius: RPC, DAS, giao dịch nâng cao, webhook và luồng dữ liệu.
Truy vấn token, NFT và NFT nén theo chủ sở hữu, bộ sưu tập hoặc đặc điểm.
Truyền trực tiếp dữ liệu blockchain với độ trễ dưới một giây qua gRPC hoặc WebSocket nâng cao.